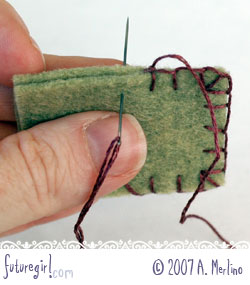
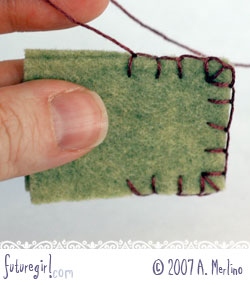
Sunday, September 30, 2007

Tutorial: Hand Sew Felt Using Blanket Stitch

This post actually contains two tutorials involving the blankets stitch:
  • How to sew two pieces of felt together using blanket stitch

  • How to sew an edging using blanket stitch

There are also some helpful extras, like:
  • How to start if you aren't going all the way around

  • How to handle corners

  • How to stitch around circles

  • What to do if you run out of floss in the middle

It's a lot to pack into one post, but they all involve the blanket stitch, so I thought they should all be together.  Let me know if there is something I can make more clear.

For other options to hand sew felt see my whip stitch tutorial and my post about choosing between blanket stitch and whip stitch.

Note One: All stitches should go in and come out the same distance back from the edge of the felt.  When making an object that will be stuffed, about an eighth of an inch works well.  If you are making an edging, use whatever length looks best.  Also keep your stitches the same distance apart.

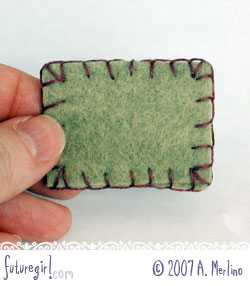
Note Two: I used to struggle with knotting my floss, but Heather Bailey's Best Knot Ever Tutorial changed my hand sewing and embroidery forever.  Seriously.

Sewing two pieces together (and how to stitch around a corner)
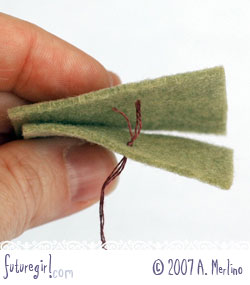

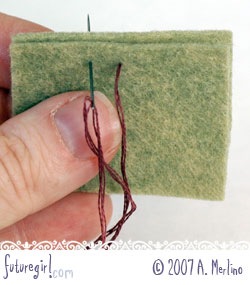
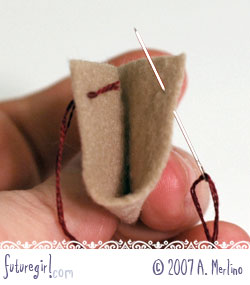
(1) Place the wrong-sides of the felt layers together.

Take your knotted floss and go from the inside of the front layer through to the outside. The knot should be sandwiched between the two layers with your floss coming out of the front layer.


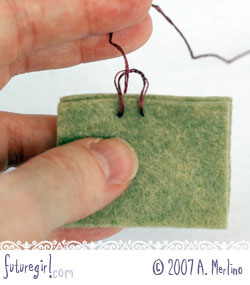
(2) Insert the needle to the left of where the floss is coming out of the front piece.


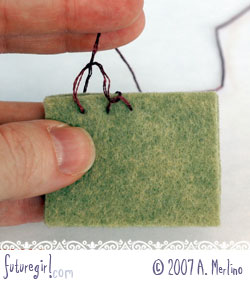
(3) Pull the floss through most of the way, then put your needle through the loop from the back to the front.

Pull the first stitch so it is a little loose.  You will need the loose floss to complete the last stitch.  See next image for reference.


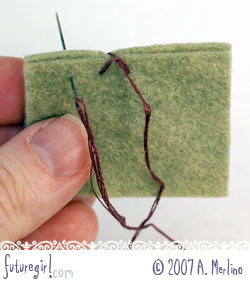
(4) Insert the needle to the left of your last stitch.


(5) Pull the floss through most of the way, then put your needle through the loop from the back to the front.  Pull this stitch (and all subsequent stitches) tight so the vertical bar is straight up and down.

Continue across using step 4 and 5.


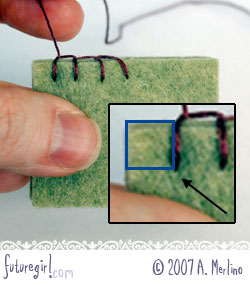
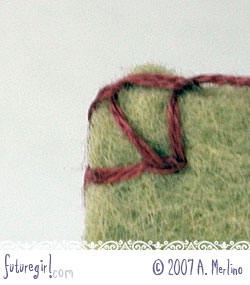
(Corner 1) Make the last stitch before the corner so your needle goes in right where the inner corner of a square would be if you made a square from the corner.  See inset in image for clarification.


(Corner 2) Insert needle into same place as last stitch.


(Corner 3) Complete stitch so that bar is diagonal from the needle insertion point to the corner.


(Corner 4) Insert needle into the same place as the last two stitches.


(Corner 5) Complete stitch so that the bar is perpendicular to the first corner stitch.

Continue across using step 4 and 5.


(6) Finish the last stitch before you need to join to the beginning.


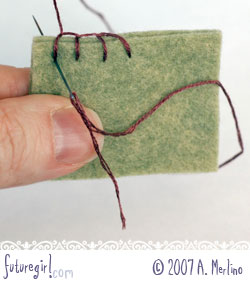
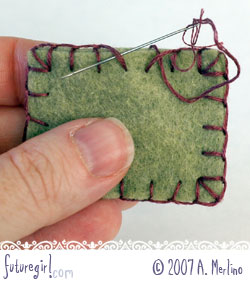
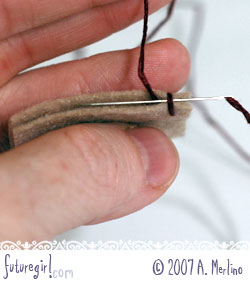
(7) Place your needle under the vertical bar of the first stitch.


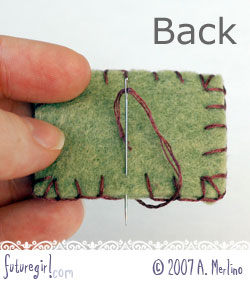
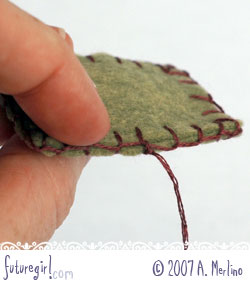
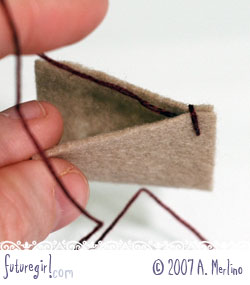
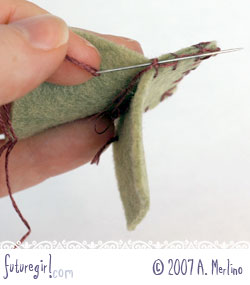
(8) Insert your needle in the back piece of felt so the tip comes out between the pieces of felt at the top (see next image for reference).  Your needle should go in the back piece where the stitch would normally come out.


(9) This is the same step as the last one, just a different view to show you how the needle is going in through the back piece and coming out between the felt pieces at the top.


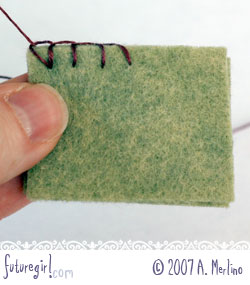
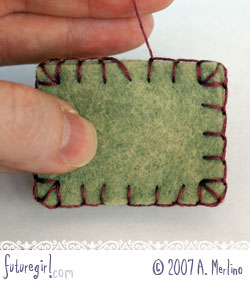
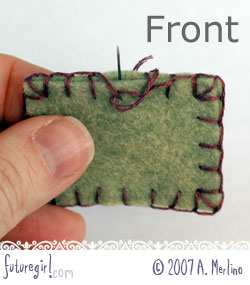
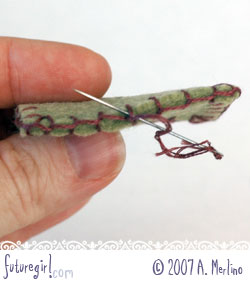
(10) Pull tight.  This is why the first stitch needs to be a little loose, because it becomes a right angle in this step.  The stitches should all look right now.

Place your needle under the back bar you just created and make a knot.


(11) This is the completed knot.


(12) Insert your needle between the felt pieces and have the end come out somewhere else on your piece.  Pull the thread through and tug a little to bury your knot between the felt pieces.


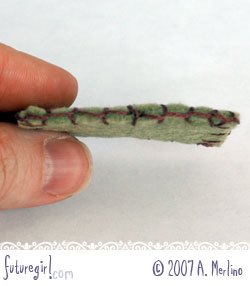
(13) You're done!


How to start if you aren't going all the way around
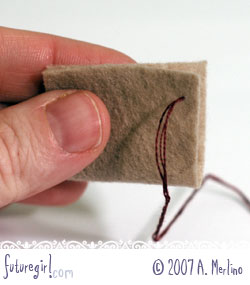

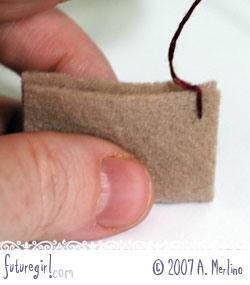
(1) This is a technique I use when I'm doing just a little bit of blanket stitch, such as the bottom edge of this jellyfish.

Place the wrong-sides of the felt layers together.

Take your knotted floss and go from the inside of the front layer through to the outside. The knot should be sandwiched between the two layers with your floss coming out of the front layer.


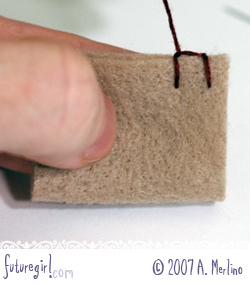
(2) Insert your needle in the back piece of felt so the tip comes out between the pieces of felt at the top (see next image for reference).

If you are stitching the edging on a single piece of felt, put your needle through the starting knot in this stage.


(3) Pull the floss through to tighten stitch.  The thread should be coming out from between the felt layers to the left of the stitch.


(4) Put your needle under the first stitch on from right to left.


(5) Pull the needle through.  There is now a loop around the top of the first stitch.


(6) Continue blanket stitch according to instructions above (step 2). When you start the blanket stitch this way, the first stitch stays vertical.


Sewing an edging (and tips for round objects)
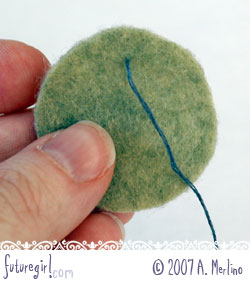

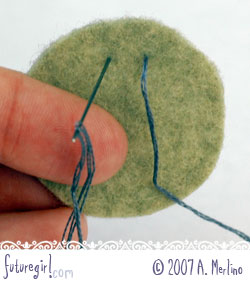
(1) Insert your needle from the back of the piece so it comes out the front.


(2) Insert the needle to the left of where the floss is coming out of the front piece.


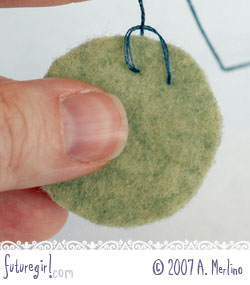
(3) Pull the floss through most of the way, then put your needle through the loop from the back to the front.

Pull the first stitch so it is a little loose.  You will need the loose floss to complete the last stitch.

If you are stitching around a circle, make this stitch VERY loose.  You will need lots of extra floss to complete the last stitch.


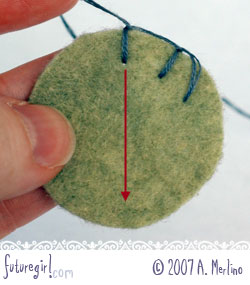
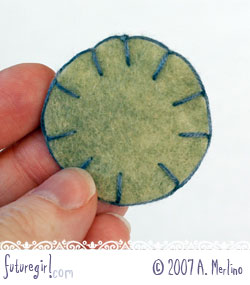
(4) You will make your stitches following step 4 and 5 above.  When stitching around a circle keep your stitches straight by holding the circle so your stitch is at the top and imagining your stitch continues down the circle through the center. The red arrow is your imagination.


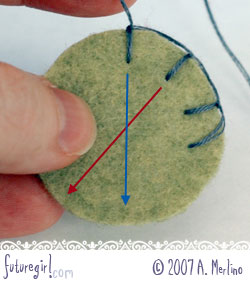
(5) Here is the next stitch and it's blue imaginary arrow.  See how the red and blue arrows cross in the center of the circle?  All of your stitches should point toward the middle.


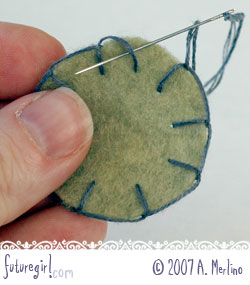
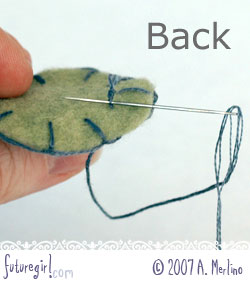
(6) Complete the edging by putting your needle under the vertical bar of the first stitch.


(7) Pull tight.


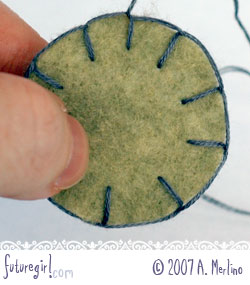
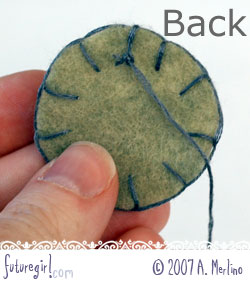
(8) On the back, put your needle through the initial knot.


(9) Make your final knot.


(10) You're done!


What to do if you run out of floss in the middle
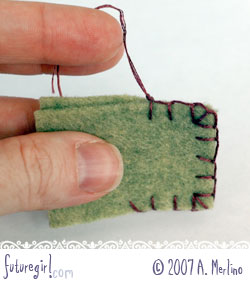

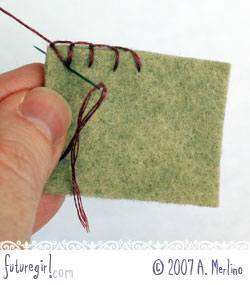
(1) Knot your floss at the top of the last stitch.


(2) Insert your needle (threaded with knotted floss) into the knot you just made and pull until the new knot is against the knot you just made.  Both should be hidden between the pieces of felt.


(3) Insert your needle into the felt to the left of your last stitch.


(4) Complete the stitch as normal.

268 Comments (comments are disabled)


ChigliakOwl said ...
Yay! Thanks for this tutorial! It is more than helpful!
9/30/2007 7:58 PM

SisterDG said ...
Alice, you SO rock the felt-sewing tutorial world. This is another stellar example, and so well photographed. I shall refer to it again and again. Thank you so much!
9/30/2007 8:02 PM

Meg McElwee said ...
Lovely - such clear instructions! A question for you - how do you set up such nicely lit photo shoots? I'm anticipating the shorter days up ahead and am looking for a way to be able to take nice shots inside!
9/30/2007 8:30 PM

Alex said ...
Another one of your great tutorials!
You know, I always struggle how to do the second stitch, a funny thing as I basically know the blanket stitch well and have done many things with it, yet, the second stitch always is some challenge for me. So thanks for the nice picture of especially that one, I am confident it won't be forgotten again.
Love the green cookie!!
9/30/2007 8:44 PM

kristin said ...
you always post the best tutes!! and your photos are so clear. ...but, i'd love to learn how to use a sewing machine...can i request a future tutorial on that? ;)
9/30/2007 8:48 PM

I was trying to teach a friend blanket stitch- think I'll just send her your link instead- the directions will be clearer and our friendship will be preserved
9/30/2007 8:53 PM

Blaize said ...
You read my mind! Awesome (and spoooooky). My friend Sylvia was just asking how to do this exact thing, and I couldn't answer. Soon she and I will sit down with some needles and floss and felt and learn together, thanks to you.
9/30/2007 10:01 PM

Pret-ty Sneak-y Sis!

Good tricks of the trade and fab photos.
9/30/2007 10:42 PM

ViVi said ...
Oh, I really needed this!! I have the cutest book ever of knitted stuffed animal patterns and there is a lot of felt and blanket stitched edging (elephant ears! squee!). I'd put them off because I was freaked out by the felt but not anymore! Thanks! :)
10/1/2007 1:17 AM

Lucy said ...
Fabulous tutorial as always!
I hope you don't mind.
You've been tagged on my blog

You don't have to play if you don't want to, I won't be offended.
10/1/2007 1:37 AM

Hilde C. said ...
Your tutorials are just perfect. The pictures are great, and you have such an eye for all the details.
I liked your new winter hat, it suits you very well :-)
10/1/2007 6:18 AM

Jude said ...
That is a terrific and very useful tutorial. I have always wondered how I should finish it off - I always have a funny last stitch that bugs me every time I look at it. As for having to add more thread -arg!
Any more stuffy patterns coming out for Christmas?
10/1/2007 6:26 PM

pedalpower said ...
Very clear tut! This is very similar to how I work but I go from the left to the right. Love how you connect the first and last stitches...very neat!
10/2/2007 1:07 AM

capello said ...
i love you alice. seriously and truly love you.
10/2/2007 8:25 AM

This is so great and perfect timing! I have a huge felt project I am going to be working on this weekend where the blanket stitch is going to be used.

I have been looking for an easy tutorial to show me the blanket stitch and yours is perfect Thanks!
10/2/2007 10:10 AM

Shannon said ...
Awesome tutorial! I love hand-sewing felt. To me, it's so much more fulfilling knowing that I hand sewed something. I love sitting on the couch, stitching away while I'm watching a movie.
10/2/2007 2:27 PM

i love this little tutorial, my two favorite things together. blanket stitch and felt. lovely colour of green too
10/3/2007 7:12 AM

Frizz said ...
I've never tried that one yet...now I'm not so scared!! Thanks so much for sharing!
10/3/2007 7:28 AM

Corvus said ...
Oh, how awesome. Im inspired already- thanks!
10/3/2007 8:12 PM

pfang said ...
Excellent tutorial, now everyone can sew :)
10/5/2007 12:29 PM

peata said ...
hands down the best tutorial ever! I have linked to it from my mini album site
Thanks so much.

scrapbook-crazy.com -all about the mini album
my blog - (http://scrapbook-crazy.blogspot.com) Crazy bout mini albums :)
10/5/2007 11:26 PM

Alice, me ha gustado mucho tu blog y los tutoriales que tienes me resultan muy útiles, he utilizado el de "punto manta" para hacer un colgante, Si quieres pasar por mi blog he dejado una foto. No se ingles, pero con los traductores on line mas o menos lo entiendo, y las fotos que pones lo explican muy bien.
Un saludo desde España.
Yolanda
10/18/2007 3:35 AM

whimsywren said ...
Alice,

Thank you so much for the great tutorial. I mastered this stitch very quickly, thanks to your clear directions and photographs.
2/1/2008 1:41 AM

Karen said ...
I found your site through google and I am so relieved :)
Thank you for your perfectly clear tut.
I just made a case for my notebook and will link to you if that is ok?

Karen
2/17/2008 3:15 PM

Tizzalicious said ...
After looking for good blanket stitch tutorials for HOURS without finding one that explained it well, I found yours, and I just want to say THANK YOU! This is the best tutorial around!
2/24/2008 6:46 AM

A. Bell said ...
Brilliant! This is exactly what I needed. Thanks so much!
4/9/2008 8:58 PM

marina pedro said ...
thanks for this toturial.its very well fotographed.thank you so much for the help.
4/16/2008 6:48 AM

Diane said ...
Thank you SO much for that. I've always wondered how to start off in the middle.
5/18/2008 5:43 PM

Judy Nall said ...
Hi, I have just found this site! It is awesome. I needed good simple directions for "blanketstitch." So easy to read and to follow.
Keep up the good work!

Always, Judy
7/21/2008 7:17 PM

shelly said ...
I've just stumbled onto your site and having fun reading the archives! I've been blanket stitching lots and now I can do the corners neatly thanks to your tutorial :D
7/31/2008 10:55 AM

nicole said ...
thank you so much for your tutorial, really helpfull!
all the best
nicole
8/24/2008 9:23 AM

Casey said ...
thank you for the tutorial, this is the best one I've found!
8/27/2008 9:07 PM

Jennifer said ...
This is awesome! Thanks for this tutorial :-) It's almost a year old, but I found it on google and it has been such a blessing...thanks!
8/28/2008 10:56 PM

Penny said ...
Thanks for the excellent tutorial. I am doing a pocket on a wool costume and needed the blanket stitch. Your lesson helped me remember how to do it.
9/5/2008 5:34 PM

LM said ...
Thank you for this!!!!! really so useful and clear, exactly what I needed!! I Love all the tutorials, hope to see more!!!
9/9/2008 5:58 PM

ginger said ...
What a great tutorial we all can use this one making felt items thank you so very much.
hugs ginger
9/20/2008 1:46 AM

Veca said ...
Muchas gracias
10/15/2008 6:51 PM

Baby said ...
Hi Alice,

Greetings! Today, I was searching for a how-to on blanket stitches and ran across your blog. First, I would like to say you are super talented! I only wish one day I can create items as nice and imaginative as yours. Unlike yourself, I am a knitter (fairly new but not quite a beginner) and have never crocheted. However, I would like to pick your brain and believe my question is universal whether you knit or crochet.

This year against my better judgement, I have decided to venture out and make Christmas gifts. Also like yourself, I have very little free time because of my more than full-time job. So, I'm looking for quick projects. One idea I had was felted coasters. Up until 3 nights ago, I had never tried felting but decided to do some sample pieces for practice. The yarns I chose seemed to felt pretty good but the amount of what I call "frizzes" was outrageous. It looked like static and yarn combined. In your blanket stitch tutorial, your swatches look very smooth and the edges are so even. Did you do anything special to get rid of all the "fly aways"? Also, I'm assuming you cut the edges. Did you use regular sizes to do so?

Lastly, are there any other "quick" projects you can think of that people would enjoy and not just stuff in a drawer or give to someone else? :o)

Thanks in advance for your help! I really appreciate it!

Fellow craftswoman,
10/16/2008 3:26 PM

Mimi Wood said ...
Unbelievably and amazingly excellent. So clearly written and photographed. I felt like you did it for me!! THANK YOU from the bottom of my heart!!
10/21/2008 11:59 PM

Aimee said ...
Why is it that every time I Google a particular technique, I'm led to one of your tutorials??

I think you need to change your moniker to SuperFutureGirl, 'cuz you rawk! ;)
11/10/2008 10:08 PM

Joanne said ...
Thanks for a great tutorial, I have been trying to remember how to do this by trying and unpicking over and over again. Why didn't I just google it!!! Thank you i will be visiting again.
11/24/2008 3:33 PM

Rainy said ...
Thank you so much! I'm in the midst of making felt ornaments and just couldn't remember how to start the blanket stitch - googling and you saved the day!
11/24/2008 7:27 PM

Gracias por compartir.
Me han venido genial estos tutoriales porque estoy empezando.
Feliz Navidad
Lo
http://labuhardilladelo.blogspot.com
11/28/2008 3:48 AM

Cate said ...
Wonderful tutorial, thank you!
12/2/2008 7:39 AM

Marianne said ...
Awesome directions! I just taught myself and my daughters - ages 10 and 6 - how to blanket stitch w/ these directions. I can now confidently teach my Girl Scout Junior troop how to blanket stitch while they earn the sewing badge. We used blunt-end needles from my cross-stitch projects. They go through the felt very easily and no one gets hurt by the sharp end.
12/2/2008 8:13 PM

Kari said ...
I just came across this yesterday as I began trying to make a felt Christmas tree and ornaments for my 1 year old. Your help was priceless! I was able to figure out the blanket stitch, how to get around corners (plenty on a Christmas tree!), and adding in more thread! I still have a lot more to go and this is a first for me, but I'm excited and you helped me! Thanks for the great step by steps.
12/3/2008 11:27 AM

Julie Ousley said ...
I should have come here first...
now the question is should I start over and re-do the jellyfish I did first, or should I keep it as a reminder to check out futuregirl FIRST?!!
12/9/2008 6:13 PM

Leslie said ...
Thanks so much for posting this! You made it really easy to follow
12/19/2008 1:31 PM

Jenny said ...
Wow. THANK YOU.
12/31/2008 4:22 PM

Daisy said ...
Oh man, I am so happy to have found this tutorial. You have saved me! I knew I was doing something wrong. Thank you for taking the time to put this together. You rock!
1/1/2009 5:02 PM

Brit said ...
Thank you! I posted a link to this tutorial on my blog after posting about the first thing I made out of felt.
http://nerdymoments.blogspot.com
1/3/2009 7:42 PM

Bon said ...
I knew I had learned this as a youngster and for the life of me could not remember how once I inserted the needle into my son's birthday banner to sew on candle #4 (my mother-in-law usually does the candle each year and this year she was not in town). Yours is the first site I visited and the photos and instructions are super. Thanks.
1/18/2009 12:21 AM

Erin said ...
Thank you so much for this wonderful tutorial! I am making a double-layer fleece baby blanket for a relative's baby and I was at a loss with the blanket stitch. But it looks great, thanks to you and your detailed blog! THANKS!!!!!

Erin
2/6/2009 8:50 PM

Ana said ...
Great tutorial! And the pictures are perfect. Thank you for the help! P.S: Will send you some pics of my finished work ;)
2/9/2009 12:17 PM

Sarah said ...
best blanket stitch tute on the web bar none, thank you!
2/12/2009 11:23 AM

Alexia said ...
I have just started a sewing project that involves felt and floss. Is there a right kind of needle or floss to get through 2 layers of felt? I have to tug so hard to get the eye of the needle with the floss through the 2 layers. I've worn leather gloves in order to avoid putting so much pressure on my fingers by adding a bit of friction.
2/18/2009 12:30 PM

Jennifer said ...
This is so great! I can't wait to try it out. This is exactly what I need! THANKS! :)
2/25/2009 9:49 PM

Midori said ...
I get hopelessly confused at a corner still. I'll work it out someday...

But hey, you wouldn't happen to know how to blanket stitch 6-sided objects would you? Like say a dice.
2/28/2009 5:39 PM

Rosie said ...
This is so helpful, thankyou!!
3/9/2009 8:41 AM

JW said ...
I was just wondering, what kind of needle and thread/floss do you use?
3/24/2009 12:14 AM

its just me said ...
Very Helpful. Best tutorial I have seen on this stitch. Thanks a Lot!!
3/24/2009 10:42 PM

thefishwalks said ...
Thanks so much! That was really well explained. Just finished my very first felt star with this stitch. So proud.
3/25/2009 8:07 AM

JW said ...
Thanks so much!
3/28/2009 1:25 AM

pk said ...
great, thanks so much! neat, good pictures, and explains any possible problems!
3/30/2009 10:43 PM

Marisol said ...
Oh my, my! your tutorials are soooo good! Million trillion thanks!
4/23/2009 2:57 PM

sewberrycute said ...
Thank you so much for this tutorial! I've been intimidated by the blanket stitch, but with your help I just finished my first project using it. It was painless!
4/25/2009 7:23 PM

murfé said ...
thank youuu sooooo much for this very detailed, superb tutorial! thanks thanks thankkks!!! xoxo!
5/31/2009 9:04 AM

Emily said ...
I am going to be a grandma for the first time in a few months. Thank you so much for the clear, easy steps to follow for the tons of baby blankets I will be making. You Rock!
6/8/2009 10:58 PM

Alicia M said ...
Perfect! Exactly what i was looking for. Thanks for the help!
6/16/2009 5:02 PM

foma said ...
This is the best website I came across surfing on the web. Have already got my felt squares and floss today and am about to start making my own starfish! will post the pic when i finish! Thanks so much!! :):)
6/26/2009 1:52 PM

sbc said ...
Thanks for putting up the tutorial. I was right in the middle of trying to sew a project that required a blanket stitch around a circle. I could not for the life of me figure it out until after I read your explanation. You did a great job of explaining it!
6/29/2009 4:57 PM

sonia said ...
Very nice and helpfull your tutorial with the felt.
come and have a look on my blog and leave me your comment about what you think.
I'm going to use your tutorial because I have some ideas to do with felt.
Sonia
http://scrapcowando.blogspot.com
6/30/2009 5:31 AM

futuregirl said ...
Everyone ... I'm so glad my tutorial has helped you!

Foma ... definitely post some pics of your project. I'd love to see it! :)
7/6/2009 9:56 PM

Nancy said ...
Your tutorial was amazing.Thankyou! Wish I could find something like this to help me make bias strips.
8/6/2009 7:19 AM

Valentina said ...
Thank you for this wonderful tutorial, it is exactly what I need to learn !

I'm back to you soon ^_^
cheers from Italy
8/19/2009 11:37 AM

futuregirl said ...
Nancy ... Oh, I totally want some of those bias tape makers. They look so cool. And bias tape is so useful. Maybe when I get some I'll be inspired to do a tutorial. :)

Valentina ... Lei è benvenuto! You are welcome!
8/20/2009 9:23 PM

Lisa said ...
you totally rock! Thanks for this! I am making felt food for my daughter and the little booklet I got in a different kit shows the blanket stitch very different! I knew it didn't look right!
8/22/2009 3:56 PM

futuregirl said ...
Weird that your booklet was wrong! Glad my tutorial helped you out.
8/22/2009 10:46 PM

Kristine said ...
I arrived at your blog through a link at refugeecrafter.com. Thank you for your clear tutorial, the pictures make it really easy to follow. My blanket stitch is looking a lot neater now. So much so that I am using it for another project. This project is much longer so can you advise me how to continue on blanket stitch when you start a new piece of thread. Thanks.
9/15/2009 1:32 AM

futuregirl said ...
Kristine ... Thanks! Glad you like the tutorial. :) The last section of this tutorial, called "What to do if you run out of floss in the middle," will help you with your long project.
9/15/2009 1:54 AM

Cross Stitch said ...
Thanks for a very detailed tutorial on hand sewing felt using blanket stitch. Very helpful to me!
9/25/2009 1:30 PM

barb said ...
Can I do a blanket stitch around the edge of a piece of material on top of another piece of material? There is no free edge,
10/6/2009 1:17 PM

Linda said ...
I loved your blog. It was very helpful. The great tips on keeping the stitches going through the center of the circle will help alot. Thanks a bunch.
10/24/2009 7:36 PM

Heather said ...
Thank you very very much for the step by step of this stich and the pictures!! I learn much better with having a visual. Much apprecaited.
Heather
http://nightdreamer_371.bravejournal.com
10/26/2009 10:19 PM

Jacqui said ...
Thanks so much for the tutorial - especially how to start a new bit of floss half-way through. Can't wait until I have that situation and I can try your solution!
10/27/2009 8:35 PM

Melissa said ...
I really appreciated this post! I made a blanket for my cousin's new baby that will be coming. I posted about it and used two of your photos with credit to you. I hope this was okay. Check out my post and pick up my "featured" button for your website! Have a great day!!! http://honeybeebzz.blogspot.com/2009/10/blanket-stitch.html
10/30/2009 10:53 AM

George said ...
Great site - perfect for beginners like me - off to make stockings now for the kids for Christmas. Thanks again
11/11/2009 1:28 PM

Katia said ...
I really found your tutorial wonderful and helpful!! I know once I start making felt food for my daughters I will not have any trouble with my stitching. Which brings me to my question. I'm not sure what tools to purchase, i.e. thread, needles, type of felt? Would you have any suggestions? Greatly appreciated!!!
11/17/2009 12:34 AM

Salvora said ...
Hello

Thanks for this tutorial, it's very clear.

I have seen pieces of felt that have this sticht around the edges (just like here) and are attached to bigger pieces of felt (as applique): for instance, a heart inside a bigger heart. How's that done? How's the small piece attached to the bigger one? It can't be done with this particular sticht, can it? I'd looking for a tutorial for that!


11/17/2009 5:35 AM

futuregirl said ...
Katia ... Thanks for the sweet comment! :) I use cheap acrylic felt, DMC embroidery floss, and needles I've had since high school. Nothing fancy. :) If you have a lot of supplies to choose from, get a little of everything and experiment. That's what I do. :)
11/17/2009 5:41 AM

futuregirl said ...
Salvora ... Sure you can use it for applique, but you'd have to come back up through the fabric instead of just wrapping around the edge. Cake. :)
11/17/2009 5:43 AM

Mallory said ...
Hurrah, I found this tutorial again!

I forgot to favourite it the last time I used it, so I'm very grateful to have found it once more ... And, of course, grateful to you for making such a great tutorial in the first place!

Many thanks. ^^
11/20/2009 5:30 PM

Mary said ...
Thanks for the info on starting a new thread in the middle of a project. Not one of the many stitch books that I have provided that info. Sewing antique felt snowman. I hope it's OK to print it?
11/22/2009 11:16 PM

Celia said ...
Thank you Future Girl!! Now I can say goodbye to my dodgy blanketstitch!
11/23/2009 9:28 PM

Amy Butler said ...
This is the best tutorial I have EVER found on the net! Thank You!
11/27/2009 12:16 PM

futuregirl said ...
Mallory ... Thank you for the sweet comment.
11/28/2009 1:24 AM

Charity said ...
Thanks so much for such a detailed tutorial! My mom is a great sewer and crafter, but lives 500+ miles away, so the internet has to be my teacher. Thanks again!
12/6/2009 2:11 AM

Christine said ...
This was so helpful!!! I needed to know how to make the first stitch vertical and you explained it perfectly. Thank you so much.
12/6/2009 2:13 AM

Edith said ...
Your tutorial is awesome.....I was having so much trouble figuring it out and was very frustrated. After seeing this I was able to do it with no problem. You rock!!
12/11/2009 5:57 PM

Karen said ...
Wonderful tutorial, thanks for sharing with us.
1/4/2010 3:28 PM

patchwork said ...
It is beautiful the way you have taken the trouble of explaining step by step about the process and the stitch.Excellent tutorial and this stitch is also used for applique work isn't it?
1/7/2010 1:36 PM

Stephanie said ...
This is exactly what I was looking for! Thanks so much!!!
1/19/2010 10:16 PM

Diana Cudecki said ...
I was looking at other web-sites but they did not have clear directions and yours did. The tips for making the corners was just what I needed. Thanks for this web-site
1/21/2010 1:19 PM

Denise said ...
Thank you so much for this tutorial! I am using the blanket stitch on my latest project!
1/22/2010 9:36 PM

Holly said ...
Very nice. Thank you heartily for the effort.
1/27/2010 2:47 PM

erin said ...
this is great! I'm going to try out the stitch.
2/22/2010 5:25 PM

futuregirl replied ...
erin ... how'd it go? :)
3/7/2010 6:02 AM

Danielle said ...
Thank you!
2/28/2010 10:59 PM

futuregirl replied ...
Danielle ... You're welcome!
3/7/2010 5:59 AM

Andi said ...
So helpful, thanks!!
3/18/2010 6:56 PM

Liz said ...
How do you blanket stitch if you want to applique a felt shape onto another fabric or piece of felt? I can blanket stitch over an edge but can't figure how to blanket stitch with applique!

Thanks as ever
Liz
4/26/2010 12:53 PM

futuregirl replied ...
Liz ... Great question! I've never used it with applique. I bet someone has a tutorial on it. :)
7/15/2010 11:26 PM

meme22 said ...
hey this is awsome i was looking for this everywere
thx
5/3/2010 10:05 PM

Halfpint77NCIS said ...
Thank you sooo much!! I'm making a baby blanket for my best friend's baby boy and this helped soo much!!!!
5/15/2010 12:23 PM

Kate said ...
Yay! Thank you for this! I have been making a lot of felt toys lately and kind of fudging the beginning and ending. This is exactly what I needed!
6/2/2010 5:44 PM

futuregirl replied ...
Kate ... Awesome! Thanks for the comment!
6/23/2010 9:05 PM

Thanks a lot. it's the best tutorial I've seen for this kind of stich.
6/3/2010 8:48 AM

Charlie said ...
Wow! What a great tutorial with clear and easy to follow pictures. I've never stitched anything before but fancied trying my hand at a felt owl and now you've made it possible... it's looking good already!

7/1/2010 6:23 AM

futuregirl replied ...
Charlie ... Yay! I'd love to see your owl once you finish. :)
8/10/2010 12:23 AM

Mel said ...
thanks. only website that helped!
8/1/2010 3:52 AM

futuregirl replied ...
Mel ... Yay for being helpful!
8/10/2010 12:24 AM

Carmen said ...
I googled "blanket stitch" and your tute came up at the very top! I should have remembered to check here first. :)
8/3/2010 7:28 AM

futuregirl replied ...
Carmen ... That is totally hilarious! :) Most of my google search traffic (5 of my top 10 search terms) include "blanket stitch." Seriously. People need to get their blanket stitch ON. ;)

I know how you feel about seeing me in the search results, too. Every time I do an image search for macrame my little mini owl shows up in the results and I think, "Come on, people! We need more macrame online!"
8/10/2010 12:28 AM

craftmonkey said ...
this looks great and now i can try and see if i can master the art too, the tute is so clear thanks so much, got so many project i want to rty with felt and now i can!
9/1/2010 9:34 AM

futuregirl replied ...
craftmonkey ... Thanks for the amazing comment!
9/13/2010 7:57 PM

Claire said ...
Hello and thanks. I am completely new to the craft world and was trying to make a felt blanket for my 2 yr old's baby doll. This info on blanket stitch was so good for me. Cheers.
9/10/2010 5:24 AM

futuregirl replied ...
Claire ... It's so awesome that you're making toys for your kid. :) How sweet!
9/13/2010 7:31 PM

meia said ...
Thanks so much.! this is awesome. ^^
10/27/2010 8:21 AM

futuregirl replied ...
meia ... You're welcome!
10/29/2010 8:49 PM

guildmaker said ...
aceness. i just posted a tutorial for making a wee treasure bag and your blanket stitching guide is way better than anything i could have shot or written. i've linked to you in said tutorial - hope you don't mind? check it out - http://guildmaker.blogspot.com/2010/11/wee-felt-treasure-bag-tutorial.html
11/4/2010 6:36 AM

Liza V. said ...
Thanks for the blanket stitch instructions, they were really helpful!
11/4/2010 10:43 AM

Bridget said ...
I'm a new user of wool felt for my quilting projects and since I don't do hand applique I had no idea how to do the blanket stitch or put together two pieces of felt, so I was thrilled to find this page! A google search brought me here and I need not look any further because you've done a wonderful job with this tutorial. Thank you so much for sharing it!
11/6/2010 9:07 AM

futuregirl replied ...
Bridget ... You are welcome! Thank you for leaving such wonderful comments on my blog. :)
11/9/2010 9:14 PM

bearseg said ...
best tutorial ever, great site, I am happy to have found you.
11/6/2010 6:01 PM

futuregirl replied ...
bearseg ... I'm glad you found me, too!
11/9/2010 9:13 PM

elsie said ...
What is the best way to assure that blanket stitches will be of the same height and spacing?

11/12/2010 10:55 AM

futuregirl replied ...
elsie ... Your sewing skill is the best assurance. :) You could use something, like a piece of paper, to measure in between each stitch to help you space them evenly. Try practicing for a bit. Practice makes perfect.
11/12/2010 11:22 AM

Stacey said ...
Thank you so much for the tutorial. It was incrediably easy to follow.
11/16/2010 10:59 PM

Melissa D. SC said ...
Hello,
I have studied your tutorial and read the comments several times....Your tutorial was fabulous. I am making about 20 felt mittens that are two pieces of felt.

The mittens have a roll down cuff. The edge of the cuff that would be closer to the finger tips will have a blanket stitch from one side to the other and then the whole mitten will be blanket stitched all the way around, but open where you would put your hand to place a small piece of scroll....

The question....How do you end your stitching when you are on one piece of felt?...We are talking about an inch and a quarter in length of stitching and then I need to finish it off so that I can stitch up the other mitten piece and then stitch the two together.

Thank you so much for your time.
11/22/2010 2:25 PM

Melissa D. SC said ...
Hello, I do not know if my last comment went through. Your tutorials have been very helpful...I am just missing the one bit of information...How do you finish your stitching when you don't go all the way around to the starting point. I am doing the blanket stitch for about an inch and a quarter on a straight side. Is there a specific way to finish the last stitch?
11/27/2010 4:45 PM

futuregirl replied ...
Melissa D. SC ... Sorry it took me so long to reply. :) See the "What to do if you run out of floss in the middle" section. Just knot your floss at the top of the last stitch you made and hide the thread end. Cake. :)
11/27/2010 4:53 PM

Jen said ...
This was a REALLY useful tutorial for me. Thank you! I posted a link to it from my blog just now! http://winkydinks.blogspot.com/2010/12/handmade-felt-ornaments.html
12/9/2010 3:59 PM

heather said ...
thanks for this useful tutorial. your photos and explanations are super!
12/10/2010 10:32 AM

Chelsea said ...
Thank you so much! This was really helpful.
12/10/2010 4:10 PM

Jessica said ...
Thank you so much for such a detailed tutorial! It really has been so helpful to me.. I was wondering though, are there any other types of threads that you would recommend for these types of stitches when using felt? I have a large quantity of yarn, and I was wondering if I could use this to create a blanket stitch around the edge of a felt pillow. if so what type of needle would you recommend? thanks!
12/29/2010 1:51 PM

futuregirl replied ...
Jessica ... If you can pull the yarn through the felt, then it'll work. Some felt is really dense, and it wouldn't be easy to pull yarn through it. You can use any needle that you can thread the yarn in. There aren't any rules. Play around and see what works for you. :)
12/29/2010 6:53 PM

LindsayG said ...
Thank you for this tutorial!
1/22/2011 2:25 AM

futuregirl replied ...
LindsayG ... You're welcome!
1/23/2011 11:28 PM

Janine said ...
I just tweeted this tutorial because seriously, it rocks. I've been going a bit nutty trying to figure out how to end this stitch neatly, and you've answered every single question I had. Thank you!!
1/29/2011 3:04 PM

futuregirl replied ...
Janine ... Thank you! Glad it helped you out. :)
1/29/2011 5:15 PM

autumn said ...
Wow! This is exactly what I was looking for! Your photographs are EXCELLENT! Thank you for sharing :-)
2/7/2011 1:19 PM

futuregirl replied ...
autumn ... Yay! Glad you liked my tutorial
2/7/2011 4:51 PM

R said ...
This blog helped me a lot! Thankyou!
2/23/2011 5:01 PM

futuregirl replied ...
R ... You're welcome!
3/7/2011 11:20 PM

Shan said ...
Thanks for this tutorial, about to embark on making an iphone case and this is exactly what I was looking for!
3/6/2011 2:23 PM

futuregirl replied ...
Shan ... Yay!
3/7/2011 11:20 PM

Jane said ...
This one is awesome! everything you need to know about the stitching process is very well said and very easy to understand.
thanks so much for this one!
Very big help =) ?jane
3/15/2011 11:36 PM

futuregirl replied ...
Jane ... Thanks for leaving such a great comment! Glad you find my tutorial so useful. :)
3/16/2011 1:09 AM

rowena said ...
I've been doing blanket stitch wrong all this time! Who knew? Thanks for the info.
3/16/2011 5:37 AM

futuregirl replied ...
rowena ... Happy to help! :)
3/20/2011 9:48 PM

Bernice said ...
Thank you so much for your tutorials! This one and the whip stitch ones were so incredibly helpful to me. After searching high and low for how to stitch felt, your tutorials were the best. I've linked you on my upcoming blog posts. Hope you don't mind.
3/21/2011 5:46 AM

futuregirl replied ...
Bernice ... I'm so glad I helped you out! I would love it if you linked to me! Send me a link when the post is up (I didn't see it on your blog yet) so I can check it out. :)
3/28/2011 2:48 AM

Judy said ...
I found your tutorial today and loved it so much I linked to it in my felt car tutorial...the pictures are wonderful and you explain it so well. Thanks :)
5/3/2011 7:00 AM

futuregirl replied ...
Judy ... Glad you like the tutorial! I looked at your great felt car tutorial, but I didn't see a link to me. Did I miss it?
6/3/2011 9:43 PM

Joyce said ...
I'm so happy I found your website! Am a beginner sewer and all the tutorials on felts have helped me so much :) thank you!!
6/19/2011 5:37 AM

Ana Luísa said ...
Hello, I just know a few words in English, I´m from Portugal, and I really liked very much yours website! You have so many amazing things! I really fell very inspired! Thanks for teach all these fantastic craftwork!
6/26/2011 3:33 PM

Leslie G said ...
THANK YOU for adding the part about running out of floss midway through.... ;) FANTASTIC tutorial!
7/21/2011 12:05 PM

Becky said ...
Thank you for the wonderful tutorial! Just used it to refresh my memory so I could teach my daughter.
7/22/2011 2:46 PM

Denise said ...
Wish I'd found this a couple of days ago when I was sewing a felt owl! However, it is a great reference for next time. Thank you and well done!
7/28/2011 6:18 AM

futuregirl replied ...
Denise ... Thanks! I love your sweet comment.
8/14/2011 9:55 PM

ruslina said ...
thnk u so mush .this toturial help me a lot to start m cfart.tq for sharing

7/29/2011 9:57 PM

elizabeth said ...
really good tutorial! Im just starting to learn to sew i've never sewn at all before & the instructions were really easy to follow. i understood everything quite well. the pictures were really helpful too. i would recommend this site to anyone wanting to learn these stitches.
10/2/2011 8:05 AM

futuregirl replied ...
elizabeth ... Thank you for the amazing comment! :) I'm so happy my tutorial helped you.
10/9/2011 12:29 AM

Bunny Girl said ...
This was so helpful I was looking for a good website for ages!
10/8/2011 7:07 AM

futuregirl replied ...
Bunny Girl ... Yay! Thanks for the sweet comment.
10/16/2011 12:10 AM

Erin said ...
Wow what a great tutorial! Thanks so much :)
10/11/2011 6:37 PM

Jean said ...
Thank you soooo much for your easy to follow tutorial! I am sewing little felt bird ornaments, and struggle to figure out how to start. Once I get going, its good. Thank you also for showing how to do the corners. :-D
10/12/2011 9:47 PM

Bob said ...
Thanks

10/17/2011 4:33 PM

lynne L said ...
Beautiful tutorial!!
10/18/2011 5:18 AM

Jeanne said ...
Janine said it all for me! I teach little girls how to sew and have always struggled with beginning, starting a new thread and ending this stitch. Now our finished projects will have a much more professional touch! Thank you so very much!!!
10/19/2011 11:49 AM

Ninette Perias said ...
Thank you! This was very helpful!
10/20/2011 7:32 AM

futuregirl replied ...
Ninette Perias ... You are welcome!
10/22/2011 10:31 PM

Bex said ...
Thank you so much for this tutorial. I have been wanting to learn this stitch for so long. I watched a couple of youtube clips, but your tutorial is the best by far far far. I have bookmarked your site and will be coming back for more.
10/28/2011 10:05 AM

futuregirl replied ...
Bex ... Thanks! Glad to hear you'll visit again. :)
10/29/2011 10:43 PM

Heather said ...
Excellent tutorial! I cannot wait to try it out on my Christmas presents!!
11/1/2011 2:10 PM

Michelle said ...
Super tutorial - thank you for sharing!
11/10/2011 6:24 AM

Amanda said ...
Wonderfully easy to follow, thank you!! Now I can get cracking on my Christmas owls.
11/10/2011 3:35 PM

Paula Turner said ...
Googled "felt" as I needed some help with a project (dressmaking and soft furnishings are more my thing!), and there you were! Excellent tutorial, now my hand stitching won't let me down.
11/13/2011 2:29 AM

Fiona said ...
Thanks so much for this. I am now half way through a felt crown for my 4 and a 1/2 year old, and now I am confident enough to start teaching her so we can complete this project together! Cheers x
11/13/2011 7:56 PM

Dorothy said ...
Teaching my 7yo daughter to sew a cushion & this was very clear - Thankyou!
11/16/2011 8:48 AM

awliya said ...
thanks a lot... the tutorial is really helpful =)
11/16/2011 9:23 PM

Monica said ...
Thank you so much for this tutorial! This is exactly what I was looking for! Peace to you...
11/17/2011 9:26 AM

Tricia said ...
Thank you so much! I love the look of blanket stitches, but I have always struggled with corners and finishing. Awesome tutorial. Thanks!!
11/17/2011 2:01 PM

Karen Angell said ...
Thanks for this great tutorial!!! I used it to create these really cute Christmas felt sugar cookies for Santa. Which you can see here: http://homemadeglamour.blogspot.com/
11/24/2011 12:29 AM

Cathye said ...
Thank you so much for your lesson on the blanket stitch. I just follwed each step and now have my first hand-sewn ornament for the Christmas tree! I am so proud and couldn't have done it without your clear directions and photos. Thanks again!
12/22/2011 8:38 PM

sumone said ...
thanx.it really help me!!
12/24/2011 5:31 PM

Spiritquen said ...
Wonderful! Thank you for the step by step instructions. You did a fabulous job with your explanations and photos!
12/29/2011 9:17 AM

Clarisse said ...
Hi Alice,
Thanks a lot for this post, it is exactly what I needed! Greeting from Brazil!

1/2/2012 10:46 AM

Jen maan said ...
Thank you so much for your easy to follow instructions!!!
1/5/2012 6:11 AM

Tori said ...
Nicely done! I had been trying to tell my mother how to do a blanket stitch over the phone, but it was really frustrating ! I'll send her to your tutorial and then you will have made BOTH of our days!
1/5/2012 3:10 PM

Jennie Beth said ...
I'm a big sister who is struggling with sewing boy scout badges. This was so helpful, and now he won't fail inspections! So many thanks.
1/7/2012 10:14 PM

futuregirl replied ...
Jennie Beth ... What a wonderful big sister you are! :)
1/7/2012 10:33 PM

dee said ...
loved jyour video on left hand crochet. also to do the blanketstitch is it the same for left handers?
1/9/2012 10:51 PM

futuregirl replied ...
dee ... It's probably the opposite for left-handers.
1/15/2012 9:06 PM

Angela said ...
Great job! I just stashed your site in my favorites so I can refer to it over and over. Thank you!!
1/10/2012 9:00 PM

Marisa rechenberg said ...
Thanks for the precious tips! Im still struggling with the joining knots to start a new Floss thing, but i have so many pieces to add a finishing to, that im sure i'll be ok until #30 :)
1/21/2012 7:50 PM

Tracey said ...
oh Thank you so much for the blanket stitch lesson, i had a bit of a mind blank and cound'nt remember how to start or finish stitching. i have put you on my favorites. now going to look at the rest of your blog !!
2/25/2012 11:52 AM

futuregirl replied ...
Tracey ... I'm so happy you stopped by! Thank you for leaving a sweet comment for me. :)
2/26/2012 5:58 PM

Sue said ...
awesome tutorial for blanket stitch. just retired and trying to remember all the stitches I used to love so much
2/25/2012 5:52 PM

Wonderful Thanks for the effort made
2/26/2012 10:44 AM

peppermintpenguin said ...
You are my hero!

That bottom one for starting in a new length of thread - just what I needed.

mwah!

Bouquets of flowers and thankyous.
3/20/2012 7:09 AM

Brilliant tutorial, thank you!
3/24/2012 4:49 PM

Pam said ...
Thank you for this great tutorial. I have looked at several but none gave the two pieces and the single item
directions. The instructions are precise and clear and the photos make a world of difference! Pinned. :)
5/8/2012 6:48 AM

Meghan said ...
This is a great tutorial for blanket stitch! The pictures are very clear, and you clearly put time into this. Thank you so much for sharing.
7/18/2012 7:20 AM

Alyssa said ...
Hi,
I'm wondering if you can do a blanket stitch on just one edge (not attaching two together).
Thanks for the wonderful tutorial!
7/24/2012 8:05 AM

futuregirl replied ...
Alyssa ... Yep! Just do it the same way, without the extra layer. :) Leave a longer tail so you can hide it better.
7/24/2012 8:46 AM

????? ?????? said ...
thank you so much ^^
8/18/2012 4:56 AM

Skwidspawn said ...
Hi Futuregirl! Love the site!
I have been scouring the internet trying to figure out the recommended method for stitching together two thick (1/2" or thicker) pieces of felt edge to edge, with no luck. I'm planning to cover my desk in felt, but it's too big to use one piece, and I can't have a thick seem running down the middle of the desk. Do you have any recommendations?
8/21/2012 7:25 AM

Sheila said ...
I repeat the above sentiments. This is fantastic. I have pinned it to my Pinterest. I always wondered how to start a new piece of thread when I ran out. No directions ever taught that. Thank you SO much for this wonderful set of instructions.
8/23/2012 3:45 AM

Bobilein said ...
Hey, you are really good at teaching. I've started a craft class with a few kids and this tutorial will be really helpful, having in mind I'm planning to sew bags for our yarns and hooks, I mean kids to sew themselves. Many, many thans!
Borislava
Lesnovo, Bulgaria
9/5/2012 1:37 PM

Super good instructions! Thank you so much! :))
10/3/2012 1:20 PM

Havok said ...
Oh goodness! This is exactly what I needed to see today. A google search for blanket stitch, and here I am and such lovely instructions! I've been wanting to know how to do this for ages...thanks so much for posting. :)
10/8/2012 12:39 PM

Nicole said ...
Just wanted to say thanks for this tutorial, very simple and edgy to use! Much appreciated.
10/9/2012 2:57 AM

Sheila said ...
I searched all over the web to learn the blanket stitch. When I found your site, I was truly amazed! This tutorial is excellent. I will be checking in often to see what's new!
10/25/2012 3:19 PM

Thank you for this great tutorial! I was trying to clean the cobwebs off of some 23 year old memories on how to do this!! This was very helpful!
11/1/2012 7:25 PM

Debra said ...
Hello! Wanted to thank you so much for this site. I had a stroke a few years ago and have trouble grasping things and pictures are a big help to me. I pull this up and look at it as I stitch. Thanks again for your help! God bless!
11/13/2012 3:16 PM

futuregirl replied ...
Debra ... Glad I helped you out!
11/18/2012 9:11 PM

Thank you so much for this very comprehensive tutorial! I started on my own and it was going all right, but your tutorial gave me great tips and confidence to finish my reindeer ornament with quality. I hope it's ok that I shared your tutorial at my blog. I posted a link to your site. It's just so helpful! Thanks again!
12/9/2012 12:25 PM

futuregirl replied ...
Larissa Araripe Rand ... Thank you for linking to my tutorial! I love your adorable little reindeer. :)
12/9/2012 3:15 PM

Desiree said ...
Thank you so much for sharing... I am pinning!
12/13/2012 5:23 PM

Annie said ...
Blanket stitch is one of those techniques I use every so often and forget how to do in between. I was struggling to recall how to start, knowing I have the instruction in an embroidery book somewhere, but where, when I thought to Google 'blanket stitch' and up came these lucid, logical, beautifully photographed instructions. Blessings on you, the www and Google.
12/14/2012 7:58 AM

futuregirl replied ...
Annie ... Oh my goodness, you are too sweet! Thank you for the amazing comment. Blessings on you, too.
12/18/2012 1:09 AM

Jessica said ...
I am a beginner in sewing felt and I didn't know what to do when I ran out of thread in the middle until I found your tutorial. It's well explained and you can understand the instructions easily. A very helpful tutorial. Thank you, thank you so much for this. Regards from Spain!
12/29/2012 12:55 PM

Alex said ...
Whenever I forget, I look here. Best blog EVER!
1/1/2013 9:21 PM

futuregirl replied ...
Alex ... Awwww!
1/12/2013 8:00 PM

alexis said ...
Awesome tutorial! It's nice and clear with great pics. The one issue I'm having is how to finish off the stitching for a project if I'm not going all the way around. Thanks!!!
1/8/2013 10:00 PM

futuregirl replied ...
alexis ... Thanks! You could finish just like image 2 of the last section "What to do if you run out of floss in the middle"
1/8/2013 10:24 PM

Liz said ...
Thank you so much for this! I just made a pillow using this stich, and flannel material. It looks great! And it was super easy:) I can't wait to make more stuff using this stich!!
1/18/2013 4:42 PM

Hi there. Thanks for such a great tutorial. I have linked this to my blog post on making coasters from felted wool sweaters. They are finished with a blanket stitch.
http://diaryofamadmama.wordpress.com/2013/02/21/diy-homemade-felt-coasters/
Thanks!
~Jen
2/26/2013 3:52 PM

futuregirl replied ...
Jennifer Yaple ... Thank you for linking to my tutorial! Your coasters are adorable. :)
3/2/2013 6:47 PM

Christina said ...
Thank you very much for this awesome tutorial! This is by far the easiest step-by-step craft I've ever seen, and I'm grateful for the pictures that go along with the sewing instructions because I'm NOT experienced in sewing. :)
4/12/2013 5:19 AM

Joanne said ...
Wow this is a fab tutorial and one I used last night to hand sew a felt crown for my daughters 2nd birthday
5/17/2013 1:16 AM

Alison said ...
Awesome tutorial. Thanks!
5/18/2013 6:14 PM

Kandi said ...
Very helpful. I'm been working on felt Xmas tree ornaments and knew i was doing something wrong-i had the stitch backwards. I've been teaching high-school kids how to make things using embroidery stitches.
11/10/2013 9:03 PM

Kathryn said ...
Thank you so much for the tutorial. I always come back to it whenever I need to blanket stitch something. I keep running into the same problem though. Whenever I run out of floss and try to put the needle of knotted, new floss through the old knot, it unties the knot from the old thread. Does this happen to you? Do you do a special kind of knot? I was trying not to double knot to keep the knot concealed better, but I think I'll have to, regardless, unless you know what I'm doing wrong. Again, my appreciation - I love sewing felt and the blanket stitch is adorable.
11/13/2013 5:44 PM

futuregirl replied ...
Kathryn ... I do not have the problem with my original knot unraveling. Here is the method I use for knotting http://heatherbailey.typepad.com/photos/my_favorite_knot/index.html If you're using this method already, maybe wrap your thread around the needle a couple more times to give your knot some bulk.
11/17/2013 12:29 PM

Anna said ...
Thank you for this tutorial - very helpful :-)
11/27/2013 3:37 AM

Monika said ...
Thanks, I'm doing this for the first. Fabrics is not my kind of craft, but I'm doing a small project for my kid. And this was really helpful for such a beginner as I am. Hugs!
12/11/2013 9:56 AM

futuregirl replied ...
Monika ... Woo hoo!
12/15/2013 8:59 PM

Sandy said ...
Thank you for this the display and explaining on how to do blanket stitches is done.
Happy New Year, Sandy
1/1/2015 2:23 PM

futuregirl replied ...
Sandy ... Happy New Year! Thank you for the sweet comment.
1/11/2015 9:06 PM

Judy said ...
I want to thank you for your whip stitch and blanket stitch tutorial. The start and finish are just great. In all my embroidiery books of stitches, I have never seen a how to on that.
I really appreciate it. The start and stop of my stitches are now going to please me so much more. Again thank you and I plan to share this with my embroidery stitching friends.
1/17/2015 6:07 PM

futuregirl replied ...
Judy ... Thank you for taking the time to leave such a great comment! I appreciate it. :) It's great to know that my tutorial is helpful
1/18/2015 8:12 PM

Kathryn T. said ...
I have been struggling with getting the blanket stitch going on my wool felt projects, and trying not to cuss in front of the kids. I think your tutorial will be exactly what I need to end the frustration. Thank you!
1/21/2015 9:05 AM

futuregirl replied ...
Kathryn T. ... Yay!
1/25/2015 11:04 PM

Judy said ...
FYI
This is a product you might like to check out if you haven't already.
Transfer-Eze Transfer Paper (10 pk) 81/2" x 11" Sheets

1/22/2015 5:57 PM

futuregirl replied ...
Judy ... Thanks for the tip! :)
1/25/2015 11:04 PM

Shannon said ...
Quick question: if I'm doing a two-sided polyester blanket (by hand, not machine), and I've blanket stitched three sides, turned it inside-out, how do I continue sewing the final side without the thread showing? Is it inevitable? Or do I just sew it with stitches out? Could you provide a visual, since I'm awful at descriptive tutorials? Thanks a bunch!
1/30/2015 11:59 AM

futuregirl replied ...
Shannon ... Blanket stitch is a decorative stitch meant to be on the outside of your work. I can't imagine a way to do it with your work inside out so that it doesn't show.

If you stitch something together while it's inside out, then turn it outside right before you close it up, then you would use blind stitch (also called ladder stitch) to finish the edge without your stitches showing. Good tutorial for that here http://www.positivelysplendid.com/2013/02/sew-a-pillow-closed-by-hand-blind-ladder-stitch.html
1/31/2015 12:12 AM

Claire McClelland said ...
Hello, I've found your tutorial very useful. Just slightly stuck on the section about running out of floss in the middle. Step one says to knot the floss at the top of the last stitch but I can't seem to do this. Every knot I tie ends up a few centimeters up my thread, I can't get it to sit against the fabric/last stitch. Do you have any advice? Many thanks.
4/5/2015 5:17 PM

futuregirl replied ...
Claire McClelland ... I do have some advice! OK. Make the knot with the assistance of your needle before you take it out. See step 10 of the first part of the post for photo reference -- put your needle under the last stitch you made, halfway -- wrap the thread around the point of the needle, pull tight so the eventual knot will be right there -- hold the knot while you pull the needle and the rest of the thread through the knot -- tada. See this for a step by photo tutorial of what I mean: http://heatherbailey.typepad.com/photos/my_favorite_knot/index.html
4/5/2015 5:57 PM

Claire McClelland said ...
Oh my gosh! You're a total superstar! Thanks very much, that worked for me and I now have a nice neat knot where I want it! Thanks for replying so quickly too, I really appreciate it. :-)
4/5/2015 6:43 PM

Sandra Mickle said ...
My hat off to you!!!!! This is the first time I have truly understood the art of blanket stitching. Your instructions are so precise and your clarity is outstanding. Good Job!!!! :)
4/18/2015 8:52 AM

Brad said ...
Just found this on Pinterest. Thanks for the great tutorial. I just wanted to give you a heads up that the links to the whip stitch and the choosing a stitch tutorials are broken, because they have .html at the end of the url instead of .aspx. Hope this helps!

6/15/2015 10:59 AM

futuregirl replied ...
Brad ... Glad you like the tutorial. :) That's weird about the Pinterest links, you'd think people would copy-paste my links when they pin stuff. :)
6/26/2015 9:16 PM

Brad said ...
Oh, no, the Pinterest link worked great - I mean the links embedded in this post up where you write "For other options to hand sew felt see my whip stitch tutorial and my post about choosing between blanket stitch and whip stitch." Both of those links are broken.
6/27/2015 9:57 AM

futuregirl replied ...
Brad ... Thanks for replying! OMG. Around 2009 I moved my blog from Blogger to an app I built myself. I put a handler in my new site to translate "html" links to "aspx". That handler isn't working anymore. We had a problem with our host recently and it looks like they may have changed things on the server to disable that functionality. :( I'm glad you let me know so I can get it fixed. :) Thank you, Brad!
6/27/2015 2:41 PM
 
futuregirl replied ...
Brad ... Good news! I fixed the handler - yay! I need the handler because other blogs would have linked to those original Blogger pages (html) and I'd hate for all of those links to be broken. I appreciate the heads up. :)
6/27/2015 2:54 PM