I've been using vinyl-coated paper clips as stitch markers for years. At first it was out of necessity. I just grabbed some while I was crocheting. When that project was done, I tucked them in with my hooks, so I kept using them. I've lost some here and there over the years, so I thought I'd treat myself to some grown-up stitch markers.
I was shocked to find out that stitch markers cost about 12 cents apiece for about .003 cents worth of plastic. That's ridiculous. Especially when I can find vinyl-coated paper clips just about anywhere for cheap. Even though I'm thrifty, I probably would have just plunked down the $3 for 24 stitch markers, but they had little plastic knobbies on them that would catch on the yarn when you mark a stitch. Come on! Couldn't they at least make the edges smooth?
I've decided to embrace my inner cheapskate and add to my paper clip stitch marker stash. For all you thrifty chicks who want some inexpensive, colorful stitch markers, here's how I make them:
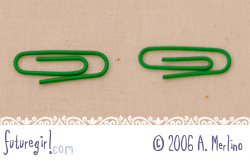 | First, I squish the interior loop so it is tighter. |
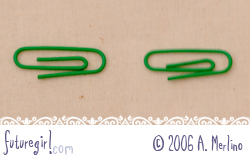 | Second, I bend the interior loop so it's closed. |
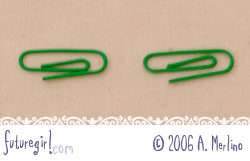 | Third, I angle the interior loop so its tip is centered. |
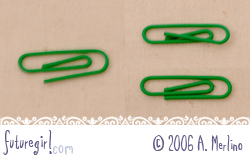 | Fourth, I bend the exterior end in so it rests tightly against the interior loop. This works best when I bend it a little too much inside first, then adjust it so it rests tightly against the interior loop. |
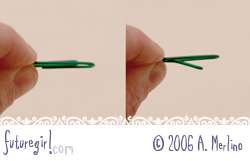 | Fifth, At the point where the exterior end touches the interior loop, I bend the interior loop down a little. |
After the modifications, I can hold the end with the interior loop facing down and easily thread the interior loop in/under a stitch. Because I closed the exterior loop, the paper clip won't fall off easily.
You can find vinyl-coated paper clips in a ton of cool colors and sizes for super-cheap. I even have some funky striped ones. You could use metal ones, but if you are like me and leave projects sitting, sometimes for months, metal ones could rust and mar your yarn. I've never had a problem with the vinyl-coated ones, and I've been using some of them for over 10 years.
65 Comments < click to leave your own comment
Love this post?
Share the love!
* * * * * *
UPDATE:
The pattern for the Starling Handbag is now
available on the free downloads page.
* * * * * *
The tiny bird bag is all grown up. I've been crocheting up a storm. The large bag is 13" across at the top, 7.5" high to the bottom of the handles, and 3.5" deep across the flat bottom. The medium bag is 11.5" across at the top, 6" high to the bottom of the handles, and 3" deep across the flat bottom. I'm working on a small version right now. They'll be like a set of Russian nesting dolls.
I like how the flat bottom helps create a roomy interior. I bought some stiff interfacing to use on the bottom of the lining to help keep the bottom flat, at least when you set the bag down. That's the plan anyway. I'm not sure how well it's going to work.
I wanted a more angled handle on these bags, instead of the slit handles you see on my smaller bags. These angled handles turn at the top so, where you hold them, they lay flat. I figured out a way to do it as I crocheted, though, so I wouldn't have to attach the handles.
I've become completely obstinate about the whole 'not wanting to join crochet pieces' thing. I've spent a ton of time crocheting bits and pieces just to figure out how to make a seamless bag or an integrated turned handle. Intellectually I know that I could be spending that time perfecting my joining skills, but I *absolutely do not* want to join crochet pieces. Just thinking about doing it makes my face scrunch up.
The side-benefit of my willfulness is that when I finish the last stitch of the bag, I'm done. Well, except for the lining. It's great to clip the yarn, weave in the end, and have a bag sitting before me. I guess I'm crazy like a fox.
54 Comments < click to leave your own comment
Love this post?
Share the love!
** UPDATE: Sasha the Seahorse Pattern & Instructions PDF is available on my
free downloads page**
Sasha is made of Limbo Lime felt, plastic pearl beads, periwinkle floss embellishment, and eyes made from a white sequin and a cooper-colored bead.
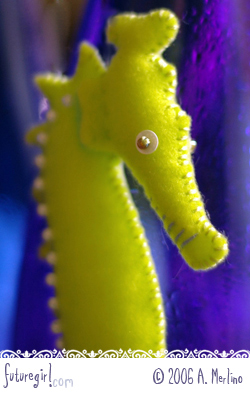
I approached the design of Sasha the same as Sigmund. I did a Google search for seahorses and studied all the different seahorse features. I never realized how truly bizarre these creatures are. The more you look at seahorses, the weirder they look, just like a word sounds weird if you repeat it over and over. Seahorses are very very elaborate, so I had to really pare down the design to basic elements. I used the periwinkle stitching and the pearl beads to mimic their exoskeleton-looking bodies.
21 Comments < click to leave your own comment
Love this post?
Share the love!
** update: This pattern is now available as a
free download! **
This original stuffie is the culmination of 5 pattern pieces, 25 felt pieces, 50 beads, 52 sequins, and hours of sewing. Whew! I had no idea what I was getting myself into when I decided to design an octopus back in
February. I was flying high on my easy success with the
owls. An octopus is a different story.
I have a yard of cream felt that I bought to do prototypes. There is a graveyard of weird cream arms and orbs in the lead-up to a fully recognizable octopus. The biggest challenge was the arms. I wasn't exactly sure what I wanted them to look like. The solution I came up with seems obvious now, but I didn't get it on my first try.
I also didn't work out what I was going to do for a face until I had the body and bespangled legs all sewn together. There were a couple of ways to go with the face. One is Japanese-cute wide-eyed and human-ish. I decided to go with inhuman, indifferent, google-eyed animal. Sigmund creeps me out. I imagine big sharp teeth hiding under all those legs. Why is he staring at me like that?!
I was so excited when I finished Sigmund. I wanted to honor him with a kick-ass photo shoot, so I bought that cool aquarium grass you see in the picture. I was hoping to find a cheesy treasure chest or goofy diver, too, but they only had realistic looking rocks and sea urchins and stuff. I was impressed. I almost bought one of those big undersea photos that you can tape on the back of your aquarium to use as a back-drop, but I thought that was going too far (... says the girl who just sewed a bazillion sequins on a small stuffed octopus ... ha!).
I am going to do a set of three original sea creatures. I like doing things in sets of three, like I did with the owls. I already have the next one's prototype done, and it's looking good. I going to keep it a secret for now, though. :)
46 Comments < click to leave your own comment
Love this post?
Share the love!